In a DevOps way of working GIT is a powerful tool for each team member must know. GIT is used for sharing, versioning, tracking changes and most of all for making code together. If you know the git structure and right commands for each task using GIT is not that hard. In the past ive made a PowerShell script for installing Git on your Windows OS. This script can be found: Here
Contents
Git Clone
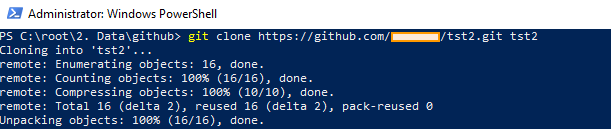
The Clone function is where it all starts. With the clone function you can download / copy a complete repository to your workstation. It will always download the latest version of the code to your laptop.
If you not give a folder name, Git will create a folder in de directory where you run the Git command with the name of the repo you clone.
|
1 |
git clone https://github.com/WOW/tst2.git tst2 |
Git Commit
After cloning the repository to your local file system you could have made some changes to the code. To save those changes so you can upload them later with a Git Push you first need to commit those changes in to your local Git Structure. When committing code you need to give it a label. This label is for example the new version number or the changes you made to the code.
You can compare a Git commit with a checkpoint. A point where you can always revert to.
|
1 2 3 4 5 6 |
#First Add all files in the directory to the index with git add filename git add * (all files in directory) #Then you can commit your first change git commit -m "My First Commit" |

Git Push
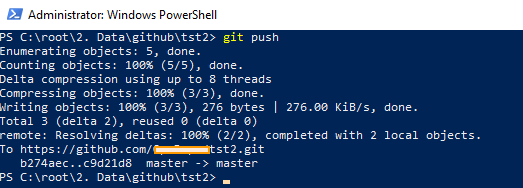
After the commit you want to upload the changes to the Git Repo so everyone can make use of the new (mostly better) version of the code. You can push the code to the “master” which is the default version of the code in the repo or to a “branch”. With branches its possible to work together on the same project. We will explain branches below.
|
1 2 3 4 5 |
#Push to the default branch git push #Push to another branch git push origin feature1 |
Git Branch
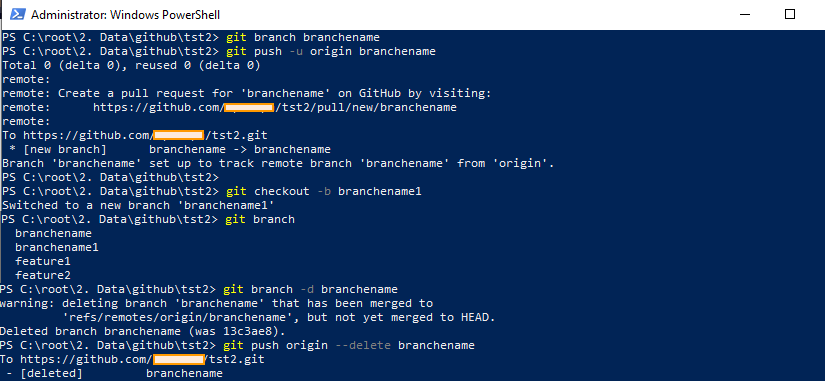
The simplest definition of a branch is a complete new workspace of the current master. So all the code in the master is also available in the created branch. Branching is used for developing features in isolated environments. So if there is made a mistake you can delete your branch and start over creating a new branch from your master. If your branch is ready it can be merged into the master. We discuss Git Merge later.
|
1 2 3 4 5 6 7 8 9 10 11 12 13 14 15 16 17 |
#Create a new local branch git branch branchname #Push branch to remote GIT Server git push -u origin branchname #Create a branch and automatically switch to it. Otherwise you need to do a checkout afterwards for switching: git checkout -b branchname2 #List all branches git branch #Delete local branch git branch -d branchname #Delete Remote branch git push origin --delete branchname |
Git Checkout
To change from the master branch to your newly created branch, you can use git checkout. Before you can use a checkout you need to be fully in sync between local and remote. Switching to a branch means you are working on the files in that snapshot.
|
1 |
git checkout feature1 |

Git Merge
When you are done with your new feature on your branch it’s time to merge that branch into the master branch. Before you can merge your feature branch you need to switch to the master branch. You can do this with the checkout command described above. Then you need to update the master branch. This can be done with git fetch.
|
1 |
git merge feature1 |

Git Pull
With git pull all changes from the remote repo are immediately downloaded and merged in your local branch. So it’s the combination of git fetch and merge.

Git Revert
Last
but not least you can face a situation where you want to undo some commits and
switch to an older checkpoint. Before you can switch to a older situation you
need to check the commit ID’s. You need to determine to which ID (commit) you
want to change. To see the commits:
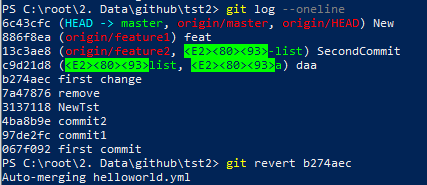
git log – – oneline
|
1 2 3 4 5 |
#Check to which commit ID you want git log --oneline #Revert to Commit git revert b274aec |